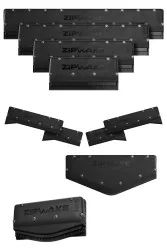
Zipwake PRO Interceptors
Zipwake Interceptors PRO Series S and Series E are the next-generation, Swedish-engineered dynamic trim devices for planing and semi-planing boats. Instead of slow trim tabs, PRO uses ultra-fast interceptors that automatically correct pitch and roll for a smoother, safer, more efficient ride.
Built-in GPS, 3D gyros and accelerometers (in the control system) drive fast-acting PRO servos to optimize running attitude. Operate in Auto or Manual, and choose from Standard (Straight), Chine, V-shape, Round, or Tunnel interceptors to match your hull.
Choosing Your Series
- Series S PRO – compact 30 mm stroke interceptors for boats up to ~50 ft
- Series E PRO – larger, 60 mm stroke interceptors for boats up to ~100 ft (or smaller, heavy boats needing extra lift)
- Need Help Choosing? Use our Tech Support Page: Tech Support Page
Series S PRO Interceptors
Series E PRO Interceptors
Installation Overview – Replacing Zipwake Interceptors
This quick overview helps you visualize the job. Always follow the official Zipwake installation guide for your specific series and model.
- Reference: Zipwake Series S Installation Guide (PDF).
Tools you’ll likely use
- Torx drivers: T20 / T25 / T30
- Wrenches: 27 mm and 13 mm (for thru-hull fittings)
- Marine sealant, drill + bits (3 mm, 5 mm), 19 mm hole saw (or M18×2.5 tapped option)
- Utility knife / scraper, antifouling paint
Fast swap (front & servo only)
- Power down the Zipwake system (battery off or remove the fuse near the distribution unit).
- At each interceptor, remove the front assembly (T30 screws). Keep hardware organized.
- Remove the servo unit (3× T25), unplug its connector, and inspect the back plate and cable gland.
- Install the new servo, plug in the connector, and fasten the three T25 screws (torque per manual).
- Install the new front assembly (T30 screws, torque per manual). Make sure blades move freely.
- Reconnect everything at the distribution unit. Keep total interceptor cable length within spec.
- Power up and perform setup/sea-trial per the operator’s guide.
Full replacement (including back plate)
- Plan placement: Start as far outboard as practical (still on the transom), keep edges parallel to the waterline, and confirm prop/appendage clearances.
- Prepare the transom: Use the drilling template; surface must be relatively flat. Drill pilot holes and final holes per size (300/450/600/750 S; 400/600/800/1000 E).
- Thru-hull fittings:
- Above waterline: drill 3 mm pilot + 19 mm hole saw; fit and tighten the cable gland (hold 13 mm, tighten 27 mm, torque per manual).
- Concealed (underwater): use 3 mm pilot + 16 mm hole saw and tap M18×2.5; fit and tighten as above. Do not coat the threads with sealant; seal under flanges as shown in the guide.
- Mount the back plate: Apply sealant to the transom interface and fasteners; fasten with the specified screw count for the interceptor length (GRP: Zipwake screws; metal: machine screws).
- Fit the servo to the back plate and connect the cable (torque per manual).
- Install the front assembly (torque per manual) and attach the cable cover. Trim excess sealant cleanly.
- Antifouling: Paint the interceptor and then run a thin knife along the blade gaps to ensure free motion.
Post-install checks
- Verify max combined interceptor cable length = 6 m (standard + extension) back to the distribution unit.
- Cycle blades and confirm unrestrained motion; then perform system setup and a controlled sea trial.
Downloads and Resources
Questions?
- Tech Support: Tech Support Page
- Check Stock: Stock Inquiry Page
- Request a Shipping Quote: Request Quote Page
- Learn More About Seatech: About Us Page
- No Sales Tax on purchases outside California
- Buy Now Pay Later with Affirm or PayPal
- FREE Ground Shipping to the Lower 48 States
- Distributed by Imtra in the USA
- Seatech Marine Products, Inc. is an authorized dealer and service center for Zipwake